The Chlorophytum or Falangium is an easy and pet friendly plant, but I have already talked about it in this article dedicated to its care and cultivation, here we begin to measure ourselves with the propagation! There are many ways to propagate the Phalange, and it is a wonderful experiment to do with children 🙂
When to propagate Chlorophytum?
The perfect seasons to propagate the Phalange are the spring And in summeras they are warm and bright. But I tell you, I made them in the office in February and they went well, maybe they just took longer.
Phalanx cutting in the ground
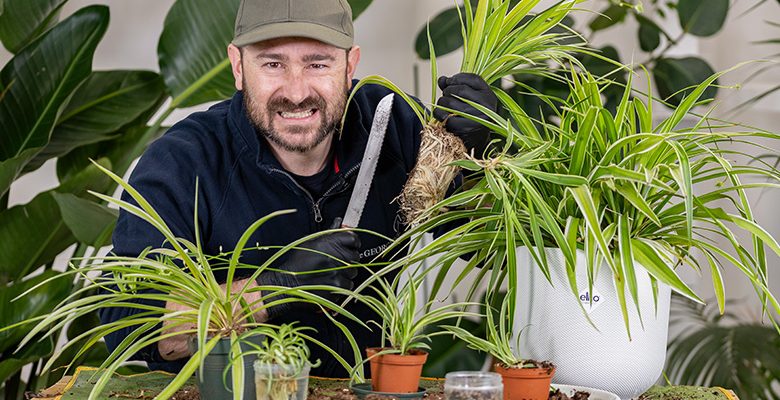
You will see what the Phalange tends to do stolons and small tufts at the nodes, often already equipped with aerial roots.
To make cuttings in the ground, cut the stolons or small tufts (leaving a little stem to help insert the cutting into the ground) and place them in moist soil. During spring and summer, even after just one week, you will have a decent root system!
Tip: to always guarantee humidity to the soil, the winning mix is: draining and light substrate + continuous sub-irrigation.
In this case it is essential keep the soil moist at all times to facilitate the creation of new roots.

Cutting Chlorophytum in water
Chlorophytums produce a large quantity of stolons and stems, which will be perfect for growing new seedlings. If you want to grow Phalange hydroponically, that’s fine start with this system from the beginningso you can skip washing the roots.
It will be enough cut one of the new stems from the mother plant and place it in waternothing stops you from already giving some structure to the substrate using expanded clay or pon, as you prefer. As soon as the new rootlets have started to grow, the right time has come to move the new Nastrino plant into the ground.
This method also allows you to monitor the development of new roots which is always interesting.
Phalange stolon and soil
This is a method that I find very nice! Instead of separating the Chlorophytum seedling, we leave it on the stolon. AND one of the safest practicesbecause the seedling remains nourished by the mother plant and does not have to rely only on itself until rooting has taken place. Just think, I use this method for strawberries too!
As soon as the new plant begins to develop new leaves, it will be possible to separate it from the original plant.
Chlorophytum stolon and water
If you are wondering if the Phalange stolon variant exists in hydroponics, the answer is obviously yes!
Nothing stops us from doing it stolon in water and, an excellent tip (which also applies to the stolon in the ground) is to cut a metal clip to obtain U’s with which to hold the seedling in position.
Division of the Nastrino rhizomes/clumps
The division of rhizomes or tufts is another propagation method which, once learned, you can apply to many indoor plants, such as Sansevierie and Alocasia, but also to many garden perennials.
In order to effectively proceed with the division of the rhizomes in the Chlorophytum (and in other plants), it will be enough:
- divide the root ball halfway between the vegetation of the mother plant and the seedling;
- leave the mother plant where it already is, filling the gap left with soil;
- repot the new plant, better if the pot is narrow.
Propagate Chlorophytum from seed
If it is grown as an indoor plant thepollination may require human help. Once the flowers have bloomed, use a very small brush or cotton ball to collect the pollen and touch the tip of the pistil of another flower. If pollination was successful pods will formotherwise the flower will wither and fall.
You should then obtain fruits which, when dried, will contain the ripe seeds. The seed pods will be greenish in color with 3 lobes. When ripe, they dry to brown and split open to reveal numerous small black seeds.
For best results, sow seeds immediately to ensure they are viable and will sprout.
Simply sow the Phalange seeds at a depth of about half a centimeter in a small pot with soil, keeping the soil moist and positioning the pot close to a bright window, waiting for the first sprout.
Keep in mind that if you are growing a variegated spider plant from seed, the resulting new seedlings may not be variegated.
I am happy with germinating them in non-sea sand and with cover so as not to always have to moisten the substrate.
latest posts published

What causes headaches after wine? 3 myths debunked

Fortified wine or sweet wine? Discover the fascinating technique of fortified wines

Dessert wine – Types and production methods

The spritz, the perfect drink for summer

Phases of wine preparation

Hangover remedies: how to get rid of it, but also how to avoid it?

Wine aging: what is it and how is it done?

White wine: benefits, types and how to pair it correctly with food

Manual harvesting vs. mechanized: advantages and disadvantages